Moisturizing lip balms are here!

11.23.2010


Pamper your lips right with a natural lip balm sure to please! They make great stocking stuffers too! Check out our site for more details!
http://blackbirdsoap.com/cart/index.php?main_page=product_info&products_id=28&zenid=129250aae0500a04871dd32708085116

We are Finally Live!

11.13.2010

If you haven't heard, we are live now! Yea! So be sure to check out our online shop. I am still uploading photos and products. I should be completely done this weekend. So if you stop by and don't see something you like check back later! Please leave us feedback about our site we'd love to hear from you!

Blackbird Soap Company Basket Give Away!

11.10.2010

How would you like to win a free basket of goodies??!!
Who doesn't love free stuff!

How do you enter?

Well it's simple, just recommend your friends and family to us. Whether they follow us on our blog or facebook  just have them like or follow us! Then have them comment on this blog post or on facebook: http://www.facebook.com/topic.php?topic=427&uid=148159268562276 or both pages and tell us who refered them to us (ie your first and last name)! Each site counts as a reference! So refer both! The person who gets the most people to like and follow us by Nov 22nd 2010 wins a gift basket full of our sample goodies! Easy enough huh!

Rules: No fake accounts. If their account looks fake in ANY WAY we reserve the right to disqualify that reference. Refered people must comment on one of our pages (or both) with who recommended them in order for that person to count. The person with the most by the end of the contest wins a free sample basket from Blackbird Soap Company w/ free shipping! Winner will be announced the following day (Nov 23). It's up to you to contact us with your shipping address! If winner doesn't respond within 4 days a runner up will be awarded.

So if you like us, pass it us on and get a chance to win!

(Photo with basket of goodies coming soon)

Holiday Cider Mix

11.09.2010


This is a really easy and simple craft recipe you can do at home, with the kids, or in a craft group!

What you'll need:
  • 1 Mason Jar (or recycled jar w/ lid) Any size is fine
  • Scrap piece of Fabric
  • Twine, Raffia, or Ribbon
  • Sheet of Paper (for printing)
  • Clear Packing Tape
Recipe:

  • 1/2 c.  - Orange Drink Mix (pre-sweetened, like tang powder)
  • 1/3 c.  - Lemonade Drink Mix (pre-sweetened powder)
  • 1/2 c.  - Sugar
  • 1/4 c.   - Instant Tea Powder
  • 1/8 tsp. - Clove Powder
  • 1/8 tsp. - All Spice Powder
  • 1/4 tsp. - Cinnamon Powder
  • Apple Juice (or just water)
Tools:
  • Scissors


In a clean jar, measure each ingredient and add to jar in layers. You can layer them anyway you want! Once finished put your lid on the jar tightly. 

Next design the label for your jar. Alternatively you can make this by hand. My label is 3in high by 3.5 in. wide. But you can make your label what ever size works for your jar. Once designed pull out a piece of packing tape long enough to cover your label leaving about a 1/2 in of extra tape on each side. For my label I needed two long pieces to cover the width of my label. Putting the tape on like this not only looks fantastic but protects your label from getting wet or damaged as quickly. Carefully put label on and gently rub in place.

This is back side of my jar. So you can see the layers. To finish your jar cut a square from a scrap piece of fabric large enough to cover your lid. I ripped my edges for a more aged look. Then place fabric on top of jar, wrap twine, raffia, and or ribbon around fabric/lid and POOF! Your done!


Note: On my label I added the directions & ingredients. For directions: Shake jar till mix is completely blended together. Add 1tb + 1tsp cider mix to 8 oz. of very hot apple juice (or water). Mix well, allow to cool to liking, and enjoy!
This is a fantastic holiday gift. It's super easy to make and affordable. Plus if you're like me, I love homemade gifts best!

Hope you enjoy,
Heather Gwinn

Natural Candle Center Piece

11.02.2010


Today we'll be making this lovely harvest candle display. It's super easy to make and here's how to do it:

What you'll Need:
  • Large Clear Vase
  • Small Clear Vase ( This must fit in large one with plenty of room around it)
  • Tea light or Votive Candle
  • Assorted Dried Beans (Many colors and sizes available)
  • Twigs (look around your yard)
  • Twine
  • Raffia
  • Two Beads
  • Acorn (or button, dried fruit slices, charm...)
Tools Needed:
  • Hot Glue Gun
  • Scissors
  • Pliers (or break twigs by hand)
  • Tape
  • Plate or Tray


Start by Trimming your twigs. This can get messy so use a plate or tray. Be careful of your eyes and flying pieces! Your twigs can be evenly sized or just eyeball it (That's what I did)


Next get your twine. Measure two pieces of twine the width of your large vase then add about 6-10 in extra length on both sides to leave room for tying later. Next tape off the section being covered in twigs (this way you don't over glue too much of your twine).  Make both pieces parallel to each other and about 1 1/2 - 2 in. apart (depending on the size of your twigs, mine are about 3 1/2 in. long) Then start adding glue to your twine one twig at a time! Glue lightly and be mindful of not gluing your piece to the surface! Spacing is great too! It lets the color behind it show through!


This is what your wrap will look like finished!

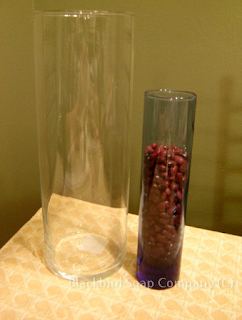
My two Vases. My smaller one I've added beans to. I left just enough room for my candle to sit on top (Having one vase inside the other will allow you to change out your candle and be safer against fires)


I've added my candle to the smaller vase now


Starting to fill. I put moss on the bottom because my vase sunk to the bottom with just the beans. This made a cushy pad for the smaller vase to sit on.


Almost done! You can layer yours however you desire.


Finished filling! Make sure to leave a bit of head room on top so your candle is a bit higher than you beans...fire safety!


Close up of candle top.


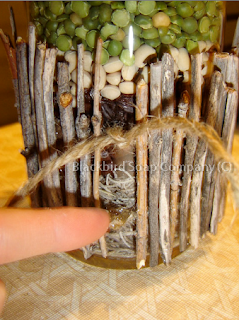
Now is the time to wrap your twigs around the vase (twine on the inside is what I did) Knot and cut the strings off the bottom piece like shown. Then add a bit of glue to secure it. Lastly add a twig over it to fill your piece in. This twig will be a bit shorter.


Lastly, I wrapped some green raffia around the twig for extra support and color. I tied it in a knot then combined the twine and raffia together to make a bow. I glued the center for an extra bit of support then added an acorn in the center. Then I finished it by adding a bead to each twine piece. To hold it in place I added a dot of glue...but a knot would work as well.

Note: This is an easy project to do. So many things can be changed out for others. Try using ribbon or yarn. The beans I used are split peas, black beans, lintel beans, and coffee beans (those give a great fragrance too) You could also use small dried red peppers, rice, or any grain. Adding powdered cinnamon and clove can give your candle an added splash of fragrance too!  This is also a fairly cheap craft. I purchased everything from walmart. The large vase was $3 the small $1. Raffia and Twine I had laying around but is only a few dollars.

Please leave any comments or questions you might have!

Hope you Enjoy!
Heather Gwinn
Related Posts Plugin for WordPress, Blogger...
Blog design by KotrynaBassDesign